Showing posts with label Gourmet. Show all posts

8/1/12

Plum Kuchen


This Is Just To Say
by Amelia Carlos Amelias

I have eaten
the plum kuchen
that was on
the countertop

and which
you were probably
saving
for breakfast

Forgive me
it was delicious
so sweet
and so warm
Plum Kuchen via Gourmet

serves 8
1 (1/4-ounce) package active dry yeast
1/4 cup warm water (105–110°F)
2 cups plus 2 tablespoons all-purpose flour, divided
1 cup sugar, divided
1/2 teaspoon salt
1/2 cup plain whole-milk yogurt (preferably Greek-style) at room temperature
1 large egg, warmed in shell in warm water 5 minutes
1 1/2 teaspoons grated lemon zest
1 teaspoon pure vanilla extract
1 1/4 sticks unsalted butter, cut into tablespoons and softened, divided
3/4 lb firm-ripe plums (about 4 small), halved and pitted (Though feel free to substitute with any other stone fruit!)

Stir together yeast and warm water in mixer bowl and let stand until foamy, about 5 minutes. (If mixture doesn’t foam, start over with new yeast.)

Add 2 cups flour, 2/3 cup sugar, salt, yogurt, egg, zest, and vanilla to yeast mixture and mix at medium-low speed 1 minute. Beat in 1 stick butter, 1 Tbsp at a time, until incorporated. Beat at medium speed until dough is smooth and shiny, about 5 minutes. (Dough will be very sticky.) Scrape down side of bowl and sprinkle dough with remaining 2 Tbsp flour. Cover bowl with a kitchen towel (not terry cloth) and let dough rise in a draft-free place at warm room temperature until doubled, 1 1/2 to 2 hours.

Spread remaining 2 Tbsp butter in bottom of a 9-inch square baking pan and sprinkle with remaining 1/3 cup sugar. Cut each plum half into 5 or 6 slices and arrange in 1 layer in pan.

Stir dough until flour is incorporated, then spread evenly over plums. Loosely cover with buttered plastic wrap, then kitchen towel. Let rise in a draft-free place at warm room temperature until almost doubled, about 1 1/2 hours.

Preheat oven to 375°F with rack in middle.

Bake until kuchen is golden-brown and a wooden pick inserted into center comes out clean, 30 to 35 minutes. Cool in pan 5 minutes, then invert and unmold onto a rack to cool completely.

COOKS’ NOTE: Kuchen is best the day it is baked but can be kept, loosely covered, at room temperature 1 day.

1/29/12

Caramel Cake

Here’s something I learned on Friday: mind your caramel. Yes, certain as the sun rises in the east, an unwatched pot of caramel sauce will get all effed up.

I have been wanting to attempt this cake ever since I found it in one of my mom’s old issues of Gourmetand then was recently reminded of it again when I was up late one night trolling Lottie & Doof’s recipe archivesbut to quote Morrissey, we tried and we failed. Yes, I overcooked the caramel glaze, so that instead of a beautiful, transparent, liquid glaze (like Gourmet’s and Lottie’s), I blanketed my cake with dark brown sugar-leather.
At one point, I considered trying to remake the glaze, substituting half and half for the heavy cream (I had used all of my cream), but the hardened caramel layer and cake had melded togetherlike a couple of best friends, inseparable.
I share this failure with you as yet another example of me trying to do too much and then doing those things poorly, instead of slowing down and doing one thing right. I need to work on this. I had an old boss who used to say: Ya do it right, ya do it light. Ya do it wrong, ya do it looooooong. I was working as a waitress in a Middle Eastern themed lunch spot, and I was given a series of very serious versions of this speech throughout my time there. And would you believe it? Eight years later, I did this caramel cake wrong. But instead of starting over (doing it long?), I simply lived with it, though I'm kind of glad I did. It was still pretty great in a dealing-with-this-dessert-is-a-bit-like-eating-a-deliciously-sweet-old-boot kind of way. And, bonus, it gave our dinner guests a good laugh.

Next time, I’ll do it right/light. Yes, next time will be different.

Caramel Cake via Gourmet
Cake:
2 cups plus 2 tablespoons sifted cake flour (not self-rising; sift before measuring)
1 teaspoon baking powder
3/4 teaspoon baking soda
1/2 teaspoon salt
1 stick (4 oz) unsalted butter, softened
1 cup granulated sugar
1 teaspoon pure vanilla extract
2 large eggs, at room temperature 30 minutes
1 cup well-shaken buttermilk

Caramel Glaze:
1 cup heavy cream
1/2 cup packed light brown sugar
1 tablespoon light corn syrup
1 teaspoon pure vanilla extract

Make cake:
Preheat oven to 350°F with rack in middle. Butter an 8-inch square cake pan and line bottom with a square of parchment paper, then butter parchment.

Sift together flour, baking powder, baking soda, and salt.

Beat butter and sugar in a large bowl with an electric mixer at medium speed until pale and fluffy, then beat in vanilla. Add eggs 1 at a time, beating well after each addition. At low speed, beat in buttermilk until just combined (mixture may look curdled). Add flour mixture in 3 batches, mixing until each addition is just incorporated.

Spread batter evenly in cake pan, then rap pan on counter several times to eliminate air bubbles. Bake until golden and a toothpick inserted in center of cake comes out clean, 35 to 40 minutes. Cool in pan on a rack for 10 minutes, then run a knife around edge of pan. Invert onto rack and discard parchment, flip cake so it is right-side up and then cool completely, about 1 hour.

Make glaze:
Bring cream, brown sugar, corn syrup, and a pinch of salt to a boil in a 1 1/2-quart heavy saucepan over medium heat, stirring until sugar has dissolved. Boil until glaze registers 210 to 212°F on thermometer, 12 to 14 minutes, then stir in vanilla.

Put rack with cake in a shallow baking pan and pour hot glaze over top of cake, allowing it to run down sides. Cool until glaze is set, about 30 minutes.

9/11/11

Video Attempt: Caramelized-Onion and Gorgonzola P(r)izza

Friends! For this video attempt, (unlike the Robyn one) I have no real their version to show you. All I can say is that when Matt and I shot this last weekend, I had many sources of inspiration—specifically, I’m talking about Dr. Steve Brule, Barefoot Contessa, Kenny Shopsin, the Julia and Jacques Cooking at Home DVD my grandma sent me a few months ago, and all of my other favorite people and entities who inspire me in the realm of cooking and entertainment.

I hope you can see what I mean, but mostly, I hope you enjoy!

(Warning: This video is rated PG-13 for language.) (Sorry.)


Caramelized-Onion and Gorgonzola Pizza adapted from Gina Marie Miraglia Eriquez via Gourmet
ingredients
¼ cup olive oil
1 ¼ pounds onions (2 large), halved lengthwise and thinly sliced
Jamie Oliver’s pizza dough or 14 to 16 ounce purchased pizza dough, thawed if frozen
¼ pound Gorgonzola dolce, crumbled (1 cup)
½ cup walnuts, toasted and coarsely chopped
¼ cup chopped flat-leaf parsley

directions
Heat 1/4 cup oil in a 12-inch heavy skillet over medium-low heat until it shimmers, then cook onions with 1/2 tsp salt and 1/4 tsp pepper, covered, stirring occasionally, until golden, 15 to 20 minutes. Transfer to a small bowl and keep warm, covered.

Stretch dough into a roughly 12- by 10-inch rectangle on a large baking sheet. Preheat oven to 500-550 degrees. Let the dough rest for 10-15 minutes while the oven gets hot.

Spread dough evenly with onions and cheese. Place it in the middle of the oven and cook until crusts are brown and cheese has melted, about 7-10 minutes.

Sprinkle cooked pizza with nuts, and parsley. Slice yourself a slice (or have someone else slice you a slice). Enjoy!

9/5/11

Mi Rosa

Mis amigos, I hope you're having a glorious, long weekend! As for me, I'm due at work in about an hour. But that doesn't mean that I don't have time to share with you the most beautiful cocktail with the most beautiful name ever. I've been trolling the old gourmet.com site recently and happened upon this beverage with the following introduction, which completely won me over:

"'To gild refined gold, to paint the lily, to throw a perfume on the violet, to smooth the ice, or add  another hue unto the rainbow, or with taper-light to seek the beauteous eye of heaven to garnish, is wasteful and ridiculous excess.' —The Life and Death of King John, William Shakespeare.

The rosebud garnish on this delicious cocktail seems a bit like painting the lily. Maybe not as bad as garnishing heaven with a taper-light, but still, probably not necessary."

For Gourmet's version, click here.
Can you tell that Matt and I got a new camera? It happened a few posts ago, and to be honest, I'm kicking myself that we didn't do this earlier. That said, fate had much to do with it. A good friend was selling her old one, and the price was too good to pass up! Anyway, part of the reason why this week is a little bon-appetempt lite is because we've been taking the camera out, learning the ropes, and even shot another fun video(!) that we hope to post soon. We hope you understand.

This week, I also sat down with the LA Times food blog and chatted about this almost three-year-old operation. You can check that out here.
So, if I had the day off, this is what I might do. Arrive at my friend's barbeque with a basket of raspberries, some tequila, orange juice, sparkling wine, and ask (quite politely): "Who is ready to gild the effing lily?"

Mi Rosa via Gourmet
1/4 cup rinsed drained picked-over fresh raspberries
1 oz (2 tablespoons) Tequila
1 teaspoon sugar
6 tablespoons fresh orange juice
6 tablespoons chilled Champagne or other sparkling wine

Garnish if desired: short-stemmed rosebud

In a blender blend raspberries, Tequila, and sugar until smooth and force through a fine sieve into a small bowl.

In a Champagne flute stir together orange juice and sparkling wine and add shaved ice to within 1/2 inch of rim. Carefully spoon raspberry mixture over ice and garnish with rosebud. Makes 1 drink.

9/12/10

Tomato Focaccia

Hi, Friends.
I was feeling a little uninspired and stressed this week, thinking I didn't have time to make anything fun; thinking: What can possibly follow up the lovely/horrible aspic and irreverent/delicious crack pie anyway? But working on an essay for another endeavor, I came across the following lines about making bread from M.F.K. Fisher's How to Cook a Wolf, and though I know that much has been said on the beauty of the bread-making process, I think Fisher really nailed it all the way back in 1942:

It does not cost much... It is pleasant: one of those almost hypnotic businesses, like a dance from some ancient ceremony. It leaves you filled with peace, and the house filled with one of the world's sweetest smells. But it takes a lot of time. If you can find that, the rest is easy. And if you cannot rightly find it, make it, for probably there is no chiropractic treatment, no Yoga exercise, no hour of meditation in a music-throbbing chapel, that will leave you emptier of bad thoughts than this homely ceremony of making bread.

I decided on focaccia as my medium into this bread-making promised land where no bad thoughts live, and this recipe from Gourmet as I've had it bookmarked for a couple of years now.

our version:
It should be noted that boiling a lone potato emits a delicious, savory smell. I ought to do this more often.
As always, nothing quite compares to the way the scent of freshly baked bread fills the apartment.
Gourmet says that this particular recipe for focaccia is "so light it's almost cakelike," and I would almost agree except that I substituted the called-for 00 flour with regular all-purpose flour. From what I've gathered, 00 flour is typically an Italian flour that has less protein and behaves in a friendlier, lighter, and airier way. Next time, I'll have to try it. This time, however, all purpose flour worked and the resulting focaccia was still very delicious if not lighter than most focaccias I've had.

Now, I know I don't normally use this forum to share events beyond my adventures in food and sometimes, as these adventures relate to my mom and grandma, but while we're talking about inspiration, can I tell you about Freelance Whales? They are my new Loney DearI know I never told you all about Loney Dear, but let's just say that I like Loney Dear very much, particularly live. So this was a week I needed a little extra nudging, a little extra hopefulness from literature, food and music. So thank you, M.F.K. Fisher, Gourmet, Mr. Tomato Focaccia, and Freelance Whales. You've all pitched in to make this post happen.


wait

for

it

...


This also happened.

RECIPE via Gourmet
Adapted from Lucia Eriquez Castellana

1 (1/2-lb) Yukon Gold potato, peeled and quartered
1 cup warm water (105-115°F)
1/2 teaspoon sugar
3 teaspoons active dry yeast (from two 1/4-oz packages)
1/2 cup extra-virgin olive oil, divided
4 1/2 cups “00” flour, divided
1 tablespoon plus 1/4 teaspoon fine sea salt, divided
1/2 lb plum tomatoes, thinly sliced crosswise
1/4 teaspoon dried oregano

Equipment:
a stand mixer with paddle and dough-hook attachments

Generously cover potato with salted cold water (1 teaspoon salt for 3 cups water) in a small heavy saucepan and simmer, uncovered, until just tender, 10 to 15 minutes. Drain and cool slightly, then mash until smooth.

Stir together warm water and sugar in bowl of mixer. Sprinkle yeast over mixture and let stand until foamy, about 5 minutes. (If mixture doesn’t foam, start over with new yeast.)

Add potato and 1/4 cup oil to yeast and beat with paddle attachment at medium speed until combined, about 2 minutes. Remove paddle attachment and attach dough hook, then beat in 4 cups flour and 1 tablespoon sea salt at medium-high speed until combined well, about 3 minutes. (Dough will be very soft and sticky.)

Transfer to a well-floured surface and knead in remaining 1/4 cup flour with lightly floured hands until smooth and elastic, 8 to 10 minutes. (Dough will still be very soft and sticky.)

Scrape dough into a lightly oiled large bowl and cover bowl with oiled plastic wrap. Let dough rise in a draft-free place at warm room temperature until doubled, 2 to 2 1/2 hours. Generously oil a 15- by 10- by 1-inch baking pan.

Punch down dough (do not knead) and transfer to baking pan, then gently stretch to cover as much of bottom as possible (dough may not fit exactly).

Cover dough with oiled plastic wrap and a kitchen towel and let rise in a draft-free place at warm room temperature until doubled, 1 to 1 1/2 hours.

Preheat oven to 425°F with rack in lower third.

Arrange tomatoes on focaccia (do not overlap), then sprinkle with oregano and remaining 1/4 teaspoon sea salt and drizzle with remaining 1/4 cup oil.

Bake until center is firm, top is pale golden, and underside is golden (lift to check), 20 to 25 minutes.

Loosen focaccia from pan with a spatula and slide onto a rack to cool slightly. Cut into pieces and serve warm or at room temperature.

Cooks’ note: Focaccia is best eaten the day it is made but can be baked 1 day ahead and kept, wrapped in foil, in a sealed bag at room temperature. If desired, reheat, uncovered, in a 350°F oven until just heated through, about 10 minutes.

6/6/10

Gourmet's yellow cake with chocolate frosting circa 1987

Matt's birthday cake is a case of what should never have been--as in, this cake should not have existed after what I put it through.

Here is a brief list of things I did wrong:
1. undercooked all three layers of cake.
2. tore two of the layers trying to get them out of pans.
3. completely finished making the frosting and even put it in the refrigerator to cool only to then spy 9 oz. of chocolate I had left out entirely.
4. didn't give frosting long enough to come to room temperature so that when I began spreading it, I further mangled the cake layers.

Gourmet's version:

 our version:
This cake is like that lucky person that walks away from a horrible car accident without a scratch. Well, let's be honest. There were a few scratches.
Icing a layer cake reminded me of the crappy first draft in writing. You kind of just need to to get the cake covered with frosting no matter how messy it is and even though crumbs will be everywhere and you will start to doubt why you even thought you could do this in the first place.
But eventually you'll get there.
Ten days after the actual date, this should finally close the chapter on Matt's birthday meal. Let's not close the chapter on Matt though. Because there's still so much more to share.
 

5/31/10

Stuffed Roasted Garlic Paste and Blue Cheese Hamburgers

While all the real chefs out there seem to be ingredient-driven--as in what looks best at the farmer's market that day makes it on the menu that night--I've pretty much stayed the course with being more ohhh-that-might-make-for-an-interesting-challenge driven. Matt's birthday meal was no exception: I had my heart set on grinding my own meat. One of my pals lent me her meat-grinding attachment--thank you Kathleen--and that was it. I had the challenge and the grinder. I only needed the recipe.

At first, I wanted to do Ad Hoc's version, but let us remember that this was for Matt's birthday dinner and Ad hoc's version didn't call for cheese. Uh, no. I remembered Gourmet had written something about making your own burger from scratch in one of their close to last issues, but when I found it, again, it just wasn't Matt enough. I turned to Martha and her recent issue, but then I remembered that she and I are fighting. So, very inspired yet still recipe-less, I kept looking and finally found one in Michael Chiarello's garlic and blue cheese version.
(1. Martha Stewart Living's June issue, 2. Ad Hoc at Home cover, 3. via Ad Hoc at Home, 4. via Gourmet's A Burger With (Homemade) Everything.)

Our version: (Recipe by Michael Chiarello. Culled burger knowledge from aforementioned places put to use in below result by me.)
Two reasons why the Michael Chiarello recipe won out. 1. Blue Cheese 2. Garlic paste, made by roasting salt and peppered garlic cloves in olive oil until they get nice and caramelized and then mashing it all together once cooled.
Apart from the satisfaction of knowing exactly what's in your ground meat, another advantage of grinding your own meat is being able to season it beforehand. We used skirt steak, which came highly recommended via Gourmet .
I was totally expecting clean, spaghetti-ish lines of ground meat to shoot out of the business end of the grinder like it does on TV, but instead I just got this glacier-flow of minced meat.
Maybe grinding meat and hamburgers in general don't make for the prettiest pictures, but this burger was delicious. Easily the best burger I've ever had. Consider the facts: You make a skirt-steak patty, make a little well in the patty, put some blue cheese and garlic paste in that well, and then cover it up with another patty and seal the edges. The result is one giant patty. Chiarello specifies 3oz. per half, but we didn't have a scale and definitely overestimated. So, word to the wise: Think manageable-eating-sized burgers. Also word to the wise: Make this garlic paste. It's the gift that keeps on giving. 

4/25/10

Coffee-Glazed Doughnuts

Gourmet's version:

our version:

Coffee and Doughnuts. The below is a study on the color brown.
So. We made doughnuts. They turned out browner than I'd have liked them to be. And our apartment did smell like a carnival for about twelve hours.

But I don't regret a thing. Making them was a lot of fun. Dissolving the yeast into warm water, tossing the dough out on the table, filling one of our biggest pots with vegetable oil and watching the little o-shapes puff up and change color within seconds of being dropped into the hot oil. It was fun biting into the first one and really fun to discover it didn't taste of char. Don't get me wrong, these guys were dense, definitely past golden brown even though we had them in the oil for a fraction of the 2 minutes the recipe called for, and yes, they would not have made the cover of Martha Stewart, but they weren't bad. I mean, they're doughnuts.

For the recipe, click here!

11/2/09

Gourmet's Potato and Kale Galette

Now that Halloween and our trip to North Carolina is over, we can get back to the business of making Potato and Kale Galettes. Galette means "whore's pasta," though I may be confusing that with pasta puttanesca.

Gourmet's version:


Our version:
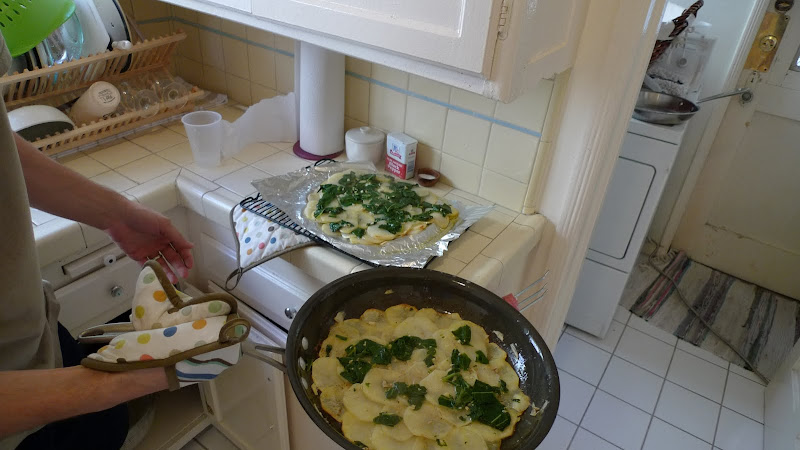
I know. And this was our BEST picture.

But look, we had a lot going against us. The first misstep occurred at the market, when Matt picked up collard greens instead of kale.


I don't think this really made a difference. We just boiled them and then sauteed them with butter and garlic.

The second thing we didn't have going for us was our lack of a mandoline. (NOTE: If this blog post were an Amelia Bedelia book, this is where Amelia would pull out a little mandolin guitar.)

Slicing four potatoes 1/16th of an inch thick by hand is no joke. (Check out how afraid I am of slicing my fingers.)


This recipe was not afraid of its butter content. At this point, the pattern sort of became: butter, potatoes, kale, butter, potatoes, kale, butter, butter, butter, repeat.

Next, things got a little meta.

When it came time to flip the potato and kale collard greens galette, things just got sad--the bottom had totally stuck to the pan.

We scraped it off and reassembled and were able to salvage it a little. I mean, it was definitely going to be an aesthetic fail, but we still wanted to eat it (all that butter!). In the end, it looked weird (especially on the one side) but tasted great.

It's good to be back home and bon appetempting.
RECIPE via Best of GOURMET

yield: Makes 8 to 10 servings
active time: 45 min
total time: 1 hr

A crisp potato cake would be tempting enough—even without the surprise of garlicky kale sandwiched between its layers.

Ingredients
1 lb kale, tough stems and center ribs discarded
1 stick (1/2 cup) butter, 6 of the tablespoons melted and cooled
4 garlic cloves, finely chopped
3/4 teaspoon salt
3/4 teaspoon black pepper
2 lb russet (baking) potatoes (4 medium)

Special equipment: a 12-inch heavy nonstick skillet; an adjustable-blade slicer

Preparation

Cook kale in a 4- to 6-quart pot of boiling salted water, uncovered, until just tender, 4 to 6 minutes. Drain in a colander and rinse under cold water to stop cooking. Drain well, squeezing handfuls of kale to extract excess moisture, then coarsely chop.

Heat 2 tablespoons (unmelted) butter in skillet over moderately high heat until foam subsides, then add garlic and cook, stirring occasionally, until golden, about 1 minute. Add kale, 1/4 teaspoon salt, and 1/4 teaspoon pepper and sauté, stirring, until kale is tender, about 4 minutes. Transfer to a bowl and clean skillet.

Peel potatoes and thinly slice crosswise (1/16 inch thick) with slicer. Working quickly to prevent potatoes from discoloring, generously brush bottom of skillet with some of melted butter and cover with one third of potato slices, overlapping slightly. Dab potatoes with some of melted butter.

Spread half of kale over potatoes and sprinkle with 1/8 teaspoon salt and 1/8 teaspoon pepper.

Cover with half of remaining potato slices and dab with butter, then top with remaining kale. Sprinkle with 1/8 teaspoon salt and 1/8 teaspoon pepper. Top with remaining potatoes and sprinkle with remaining 1/4 teaspoon salt and 1/4 teaspoon pepper.

Brush a sheet of foil with melted butter, then brush galette with any remaining butter and place foil, buttered side down, on top. Place a 10-inch heavy skillet on top of foil to weight galette.

Cook galette over moderate heat until underside is golden brown, 12 to 15 minutes. Remove top skillet and foil. Wearing oven mitts, carefully slide galette onto a baking sheet and invert skillet over it. Holding them together, invert galette, browned side up, back into skillet. Cook, uncovered, over moderate heat until underside is golden brown and potatoes are tender, 12 to 15 minutes. Slide onto a serving plate.

Cooks' note: Galette can be made 6 hours ahead and cooled, uncovered, then kept, on a baking sheet covered with foil, at room temperature. Remove foil, then reheat in a 425°F oven until heated through and crisp, about 20 minutes.